Don’t remember exactly where… next to the Atlantic shopping center. Nantes , My Favorite City !!


Nantes donwtown…


This one is on Pornic , next to the port ! 🙂 

Mourad's blog
Don’t remember exactly where… next to the Atlantic shopping center. Nantes , My Favorite City !!
Nantes donwtown…
This one is on Pornic , next to the port ! 🙂
Restaurant “le Village” in Grenoble, My Wife Favorite restaurant ever !


Restaurant in “la Tronche” next to Genoble

At Hotel MGallery in Grenoble :


The lift and sift part of the “move to cloud” can be a stopper. If you compare the price of a VM onprem and the same VM on the cloud for – let’s say- 3 years, the cloud can be more expensive at first sight…
Fortunately, you can adapt your cloud and reduce costs ( start and stop VMs only when it is required, use object storage as much as you can, use internal network for application traffic, optimize with licenses by using your windows licenses in the cloud etc.. ).
In this very use case, we will stress the object storage part with the well known “blob” storage from azure. Object storage is cheaper than file and block.
The previous pictures were stored locally, but from now to the end, content will be stored in Azure Blob storage
We will be using blob storage to store the content of this very web site.
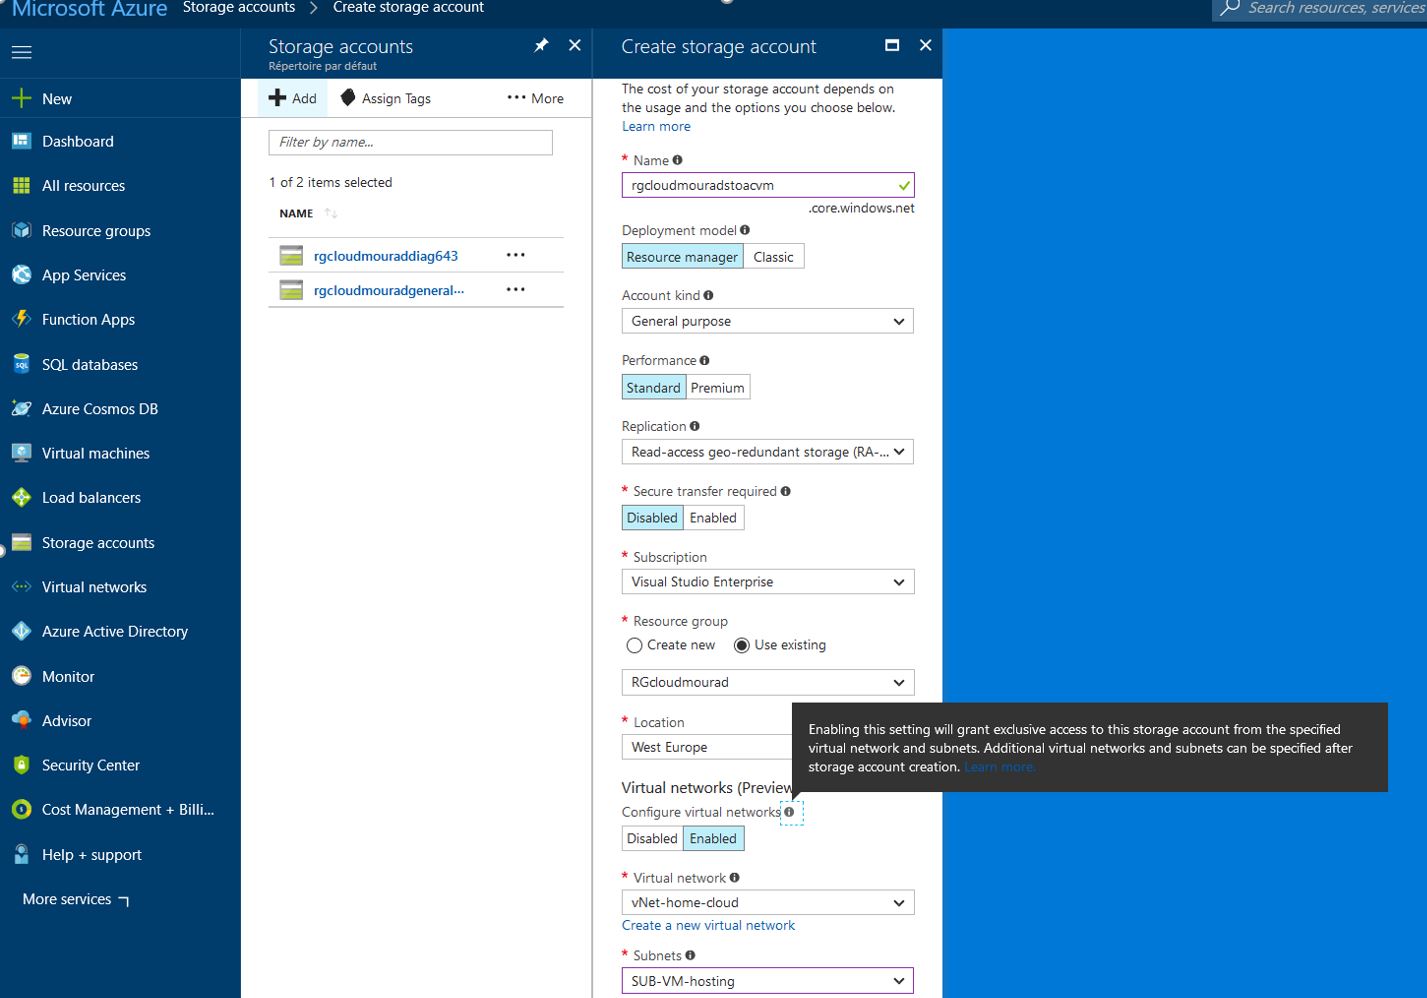
1 – Go to your Azure portal and create storage space ( general purposes):
2 – Copy the key of the storage account :

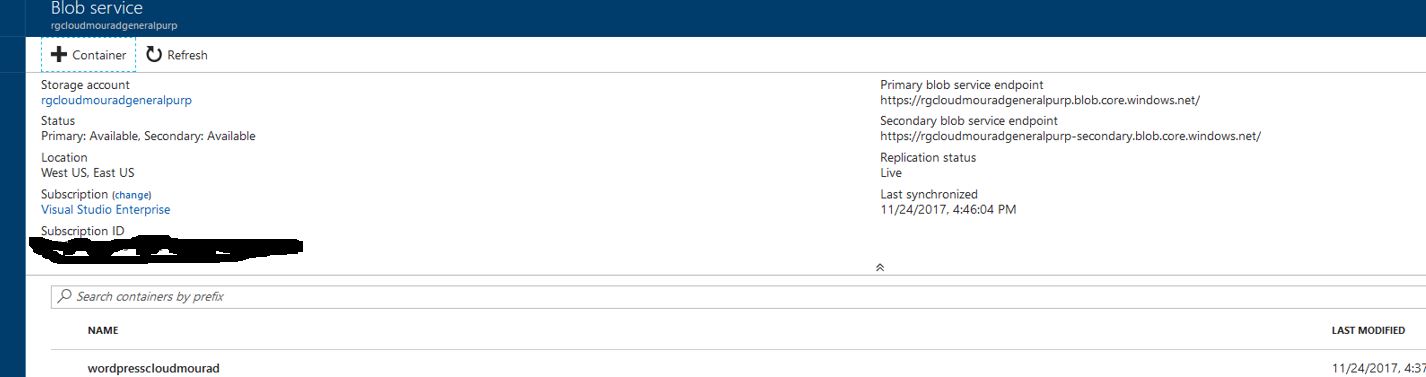
3 – Create a container with some rights to it :
4 – configure your WordPress website by downloading your storage plugin :
Download the plugin from here :
5 – And install it using the procedure :
( basically, just download and decompress in the “/var/www/wordpress/wp-content/plugins” of your server).
6 – Configure the WordPress page with storage inputs :
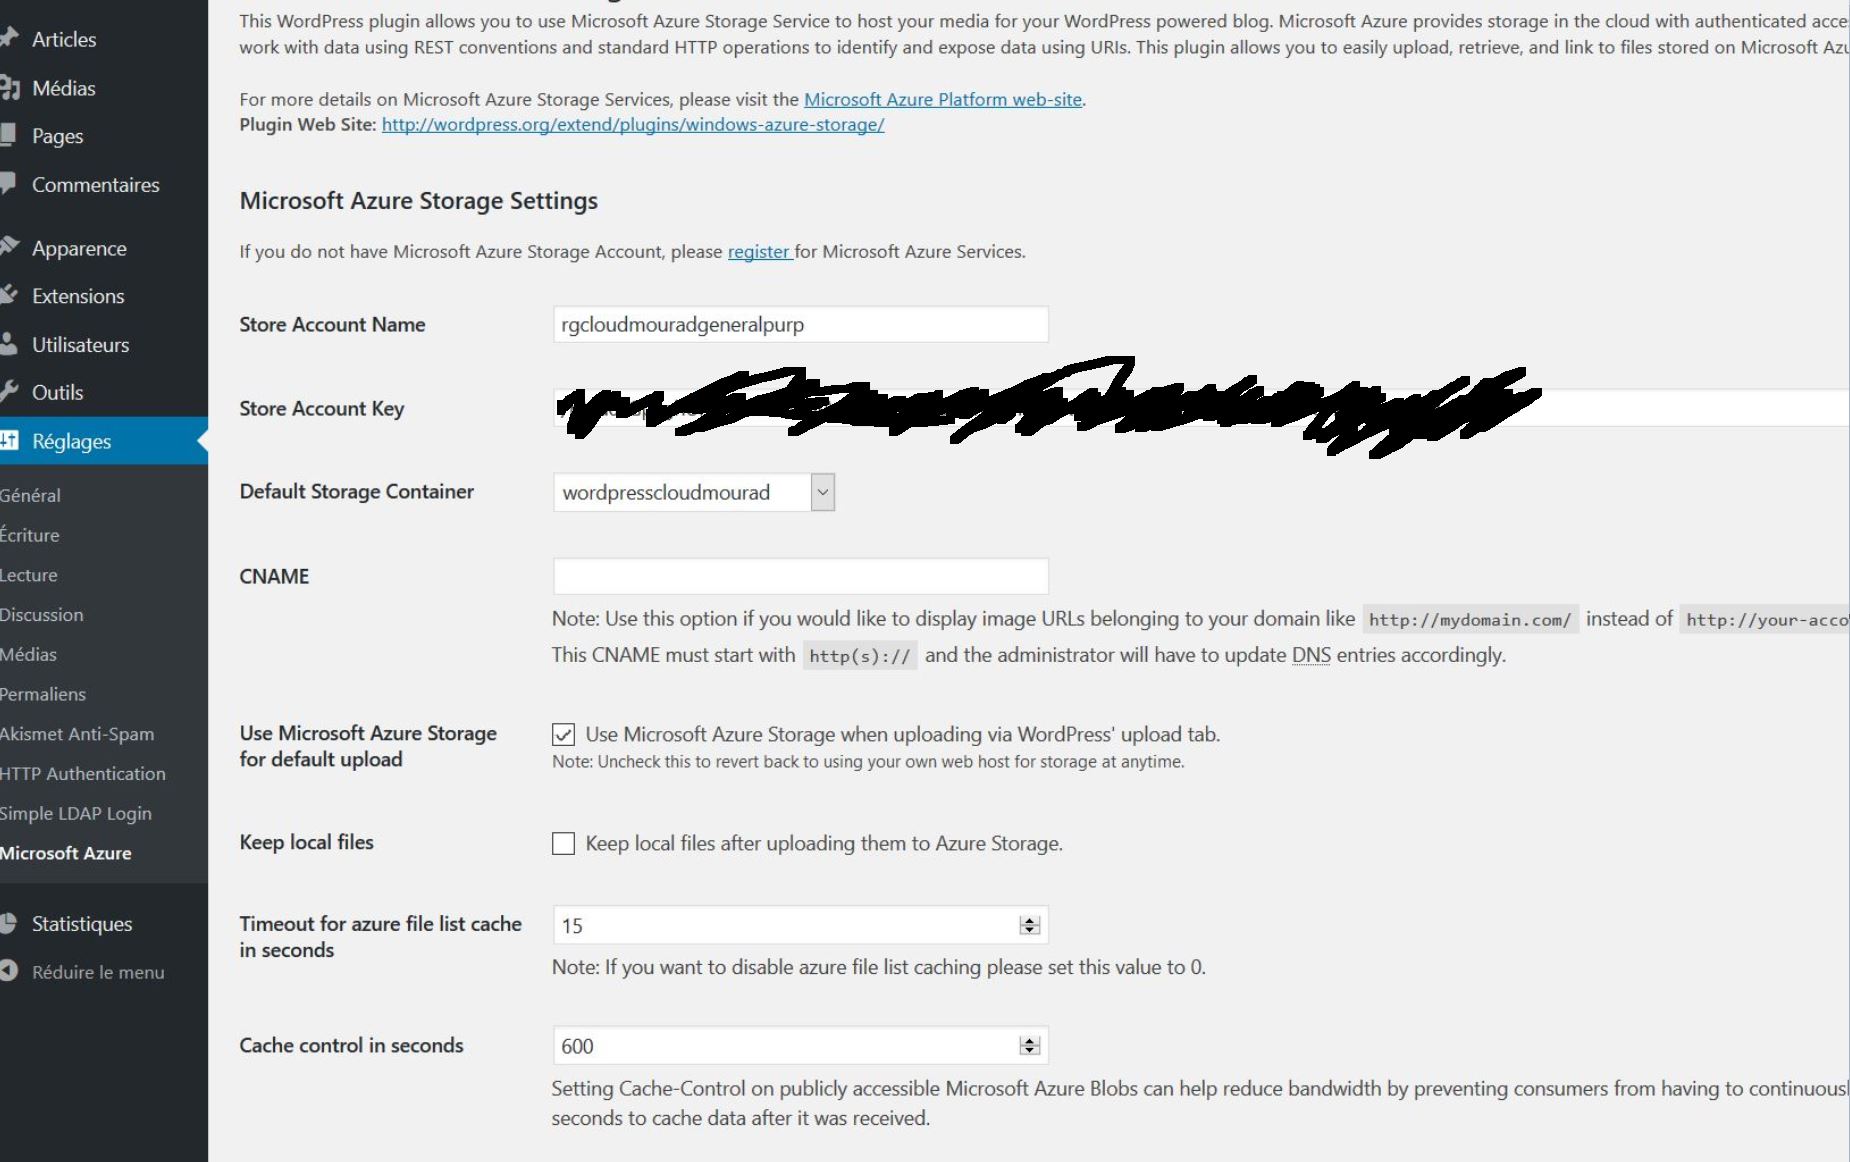
Good, the config part is done ! now we can try it !!
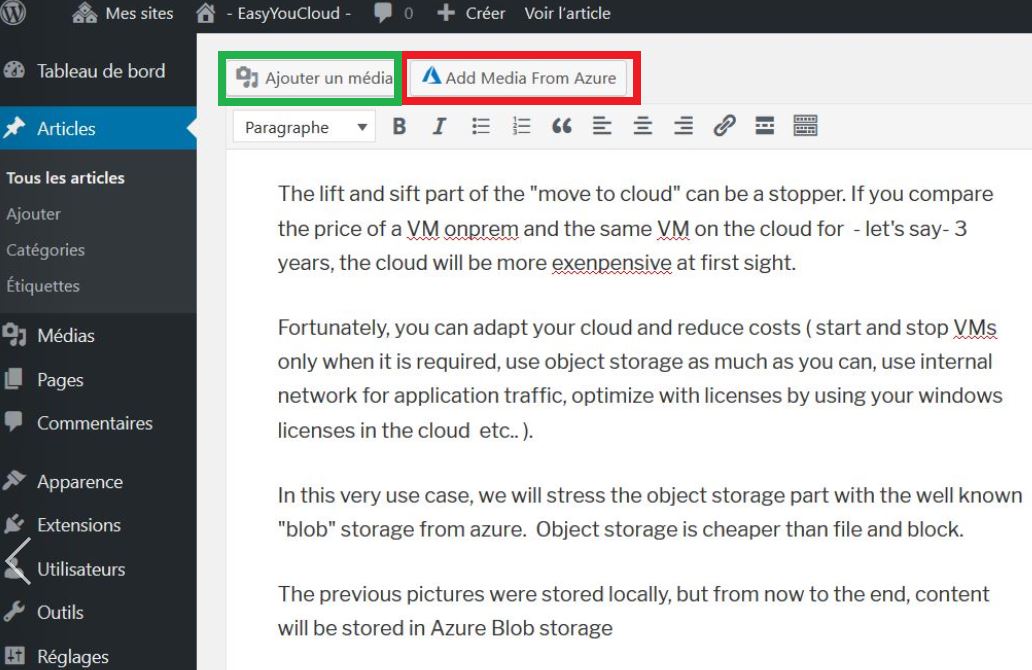
7 – Upload your first content :
( do not use the “add Media from Azure”, just use the “add media” and upload it from your laptop/station )
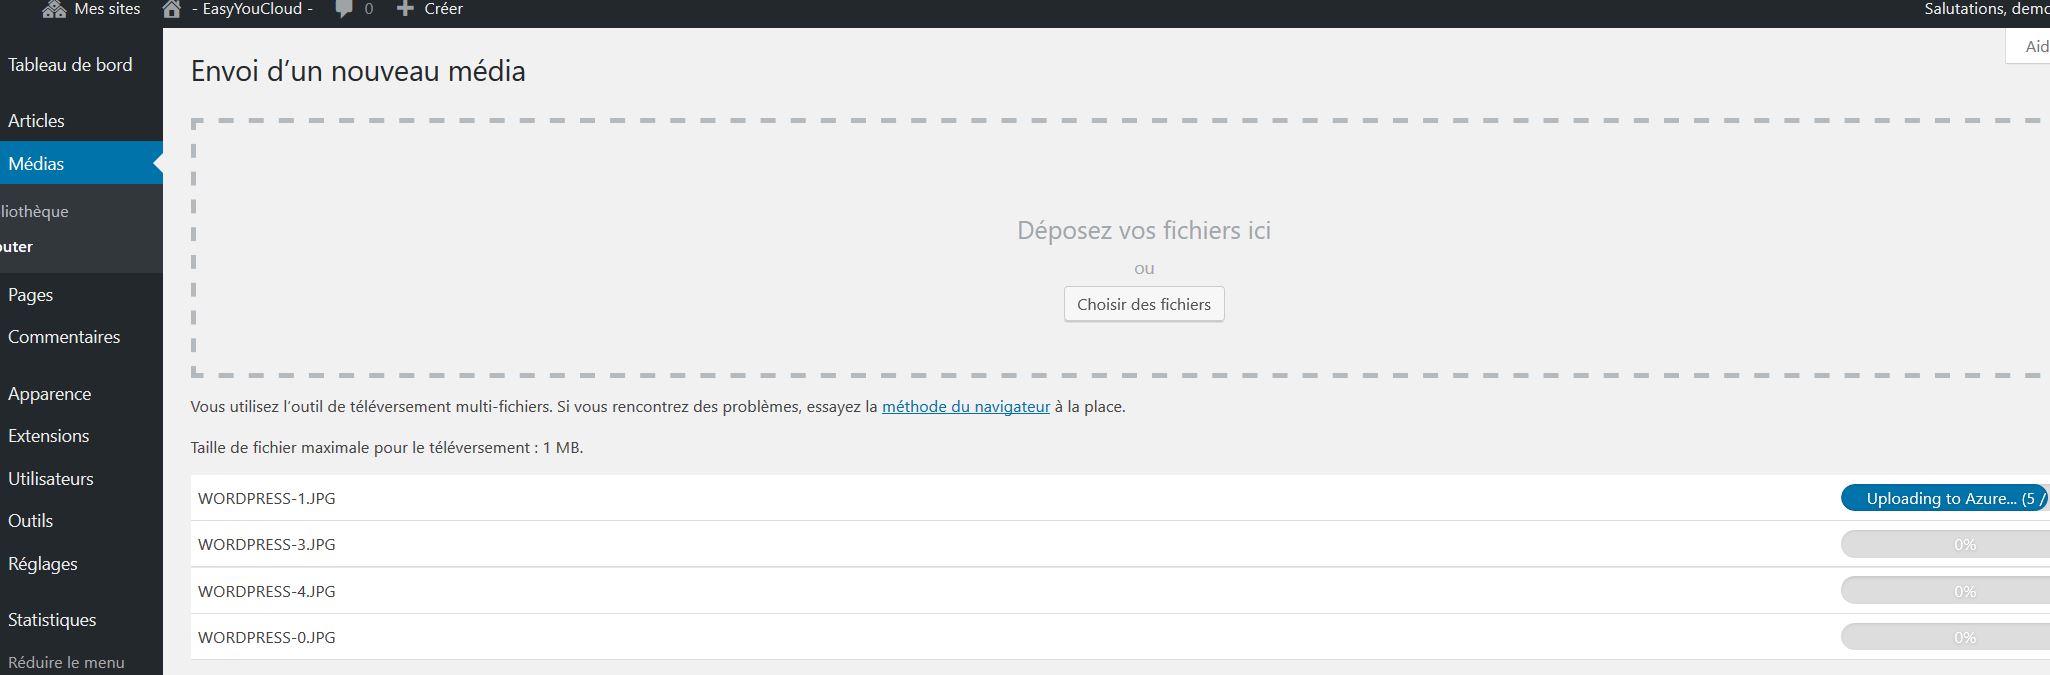
You will see ( upload to Azure line… on the left ).
8 – Check on Azure container :
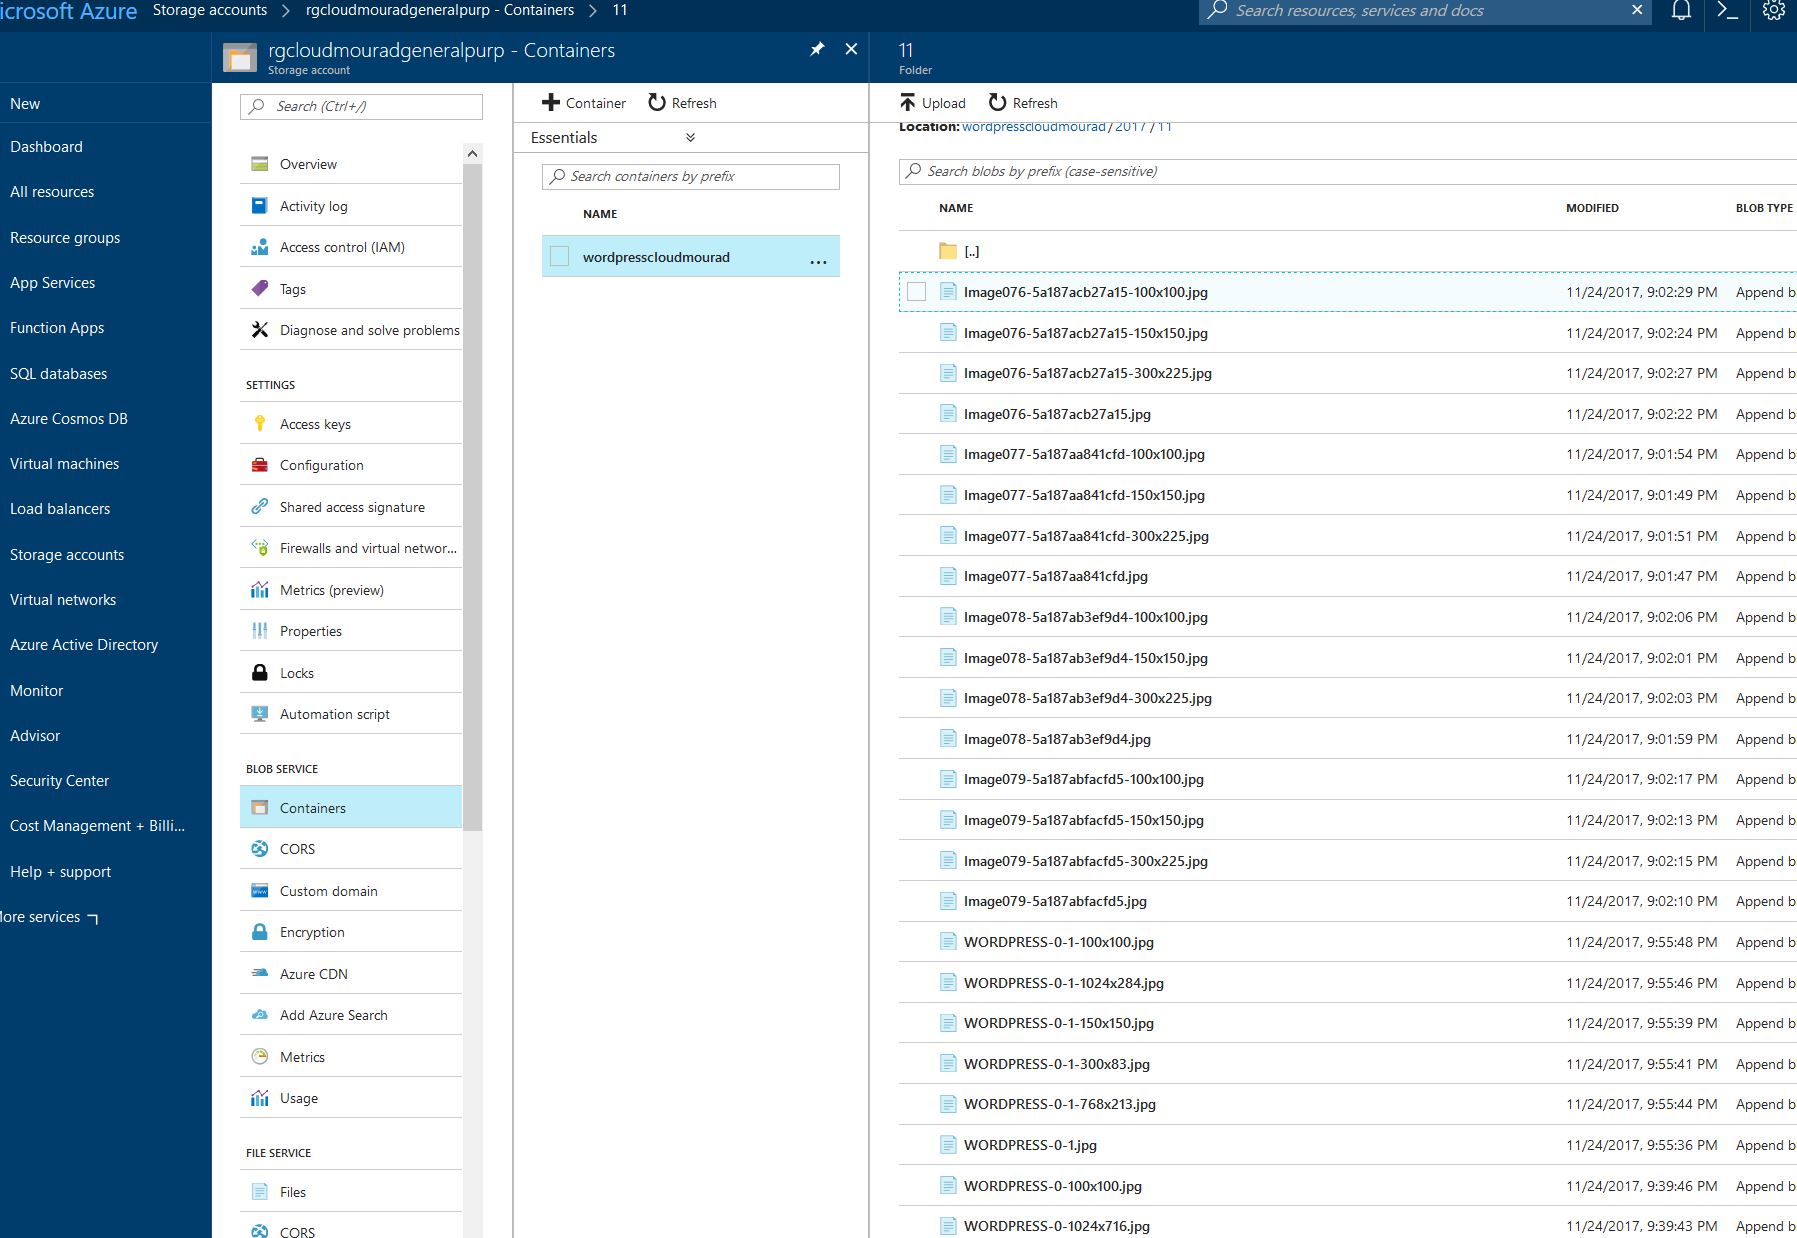
As you see, the pictures are uploaded on Azure and are not located on the local storage, this saves a lot of space .
9 – Add content in your page :
( use the green button, not the red one, currently the red one does not handle directly Azure blobs.., but this is a minor issue ).
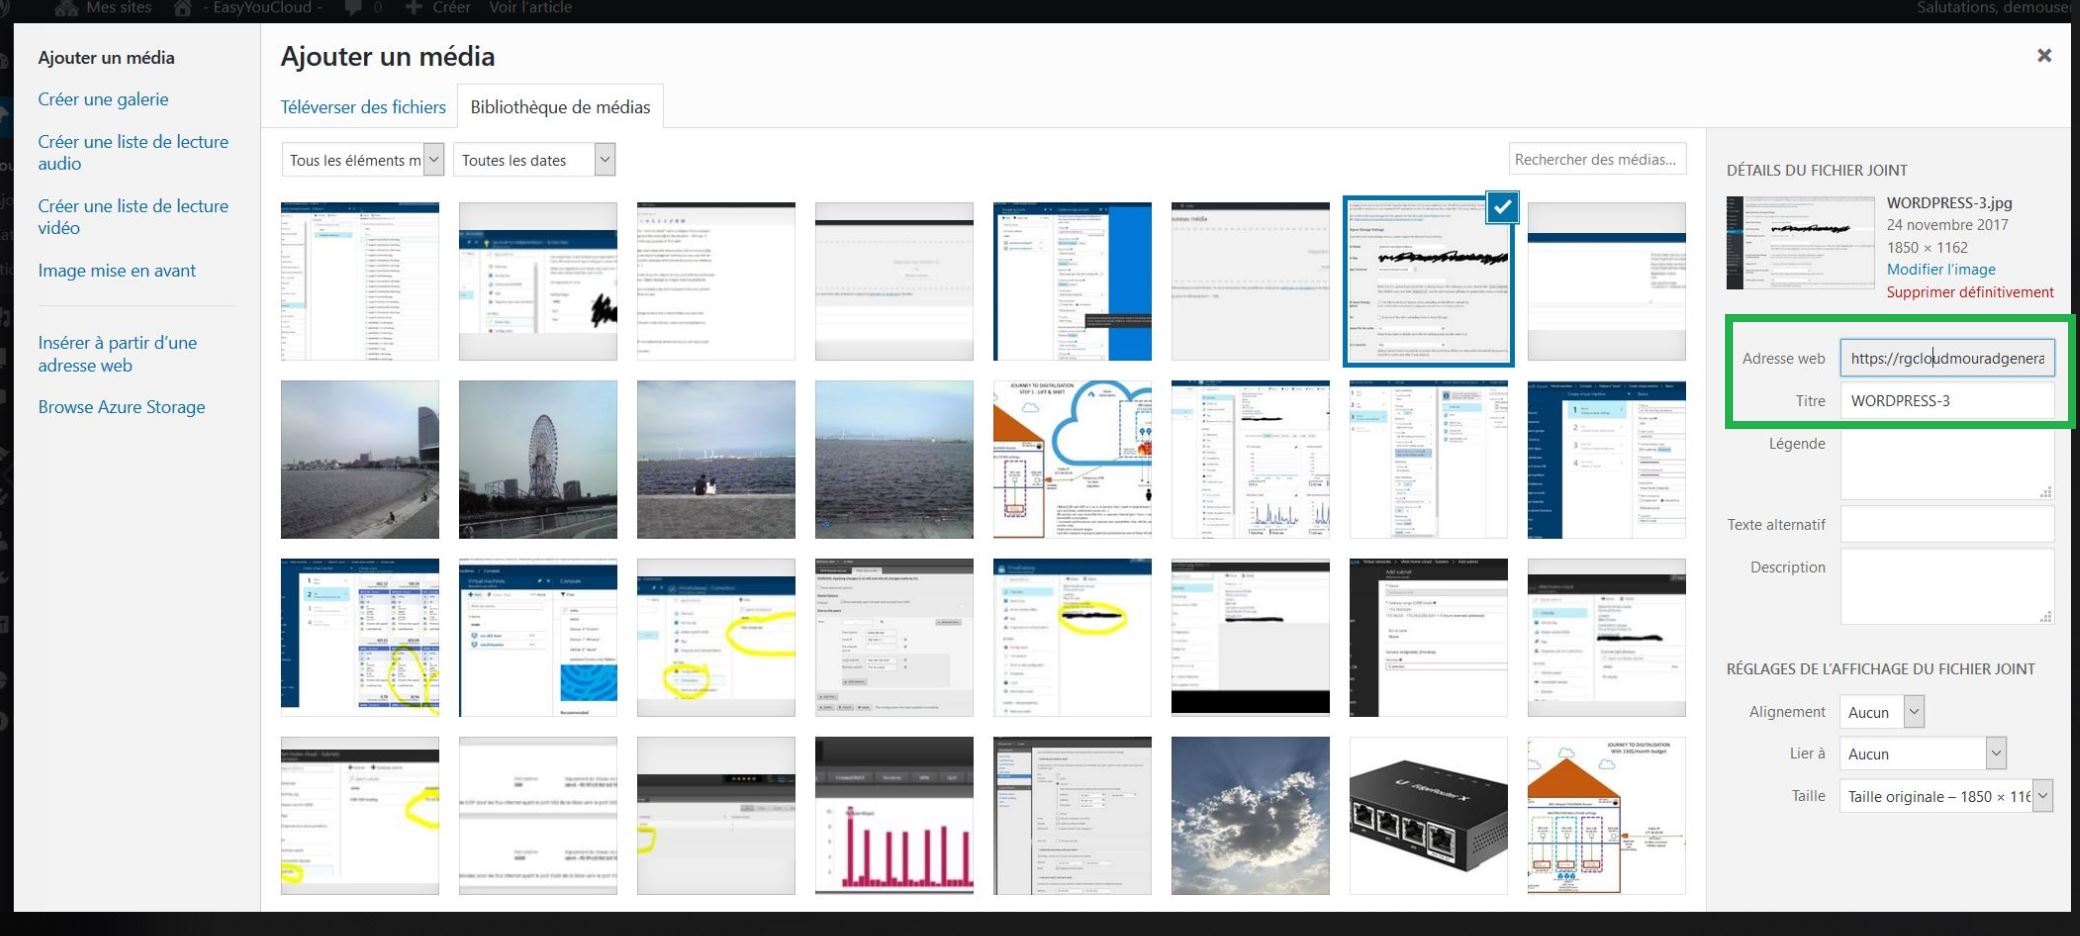
10 – Confirmation :
To confirm that the content is loaded from azure, you will see on the left the current location of the content.
Note : in this how to, we will use NAT-Traversal. This is not officially supported because of the lake of QoS, however for a PoC or a Small office, this is enough.
Step – 1 : Configuring Site To Site IPsec VPN with Microsoft Azure and UbiRouter.
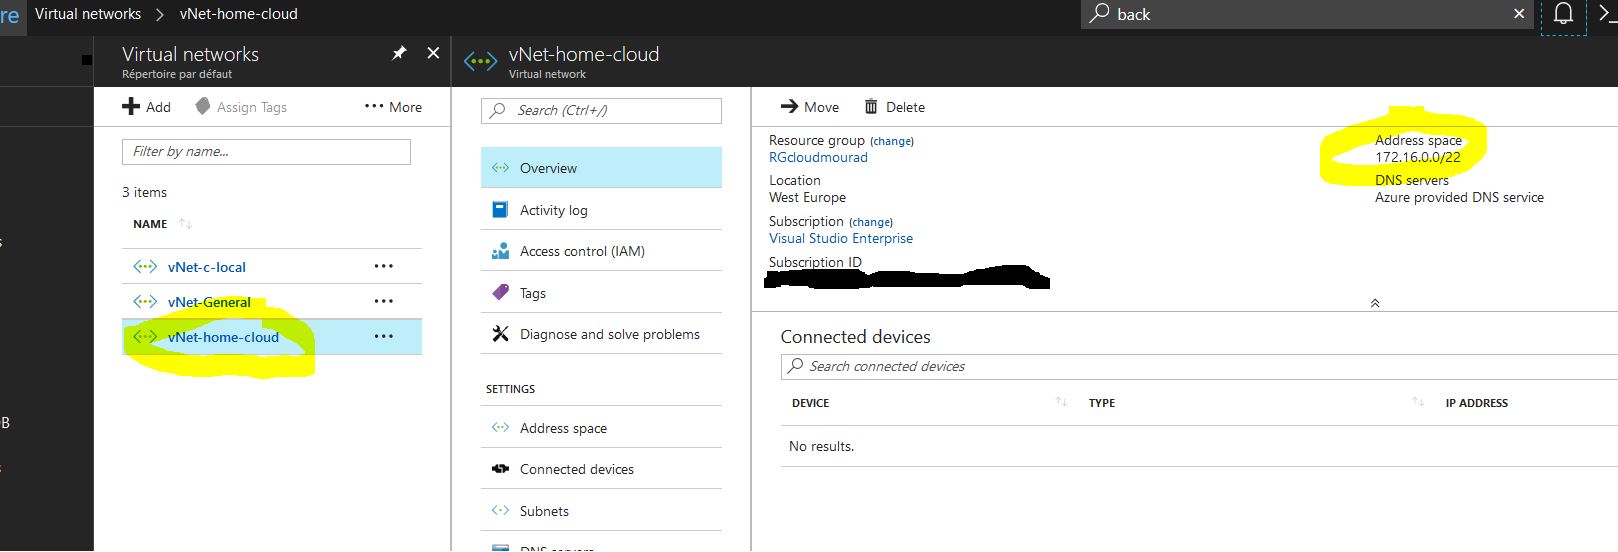
Create a vNet with your first subnet.
vNet has to have those parameters ( IP range is up to you though ) / Dashboard > New > Networking > Virtual Network :
Be Carefull, you cannot overlap networks, and Ubiquiti networks does not allow you to have same network prefixes, meaning, I cannot vpn-tunneling 192.168.0.0/17 ( or more than 17) with 192.168.X00.0/24 .

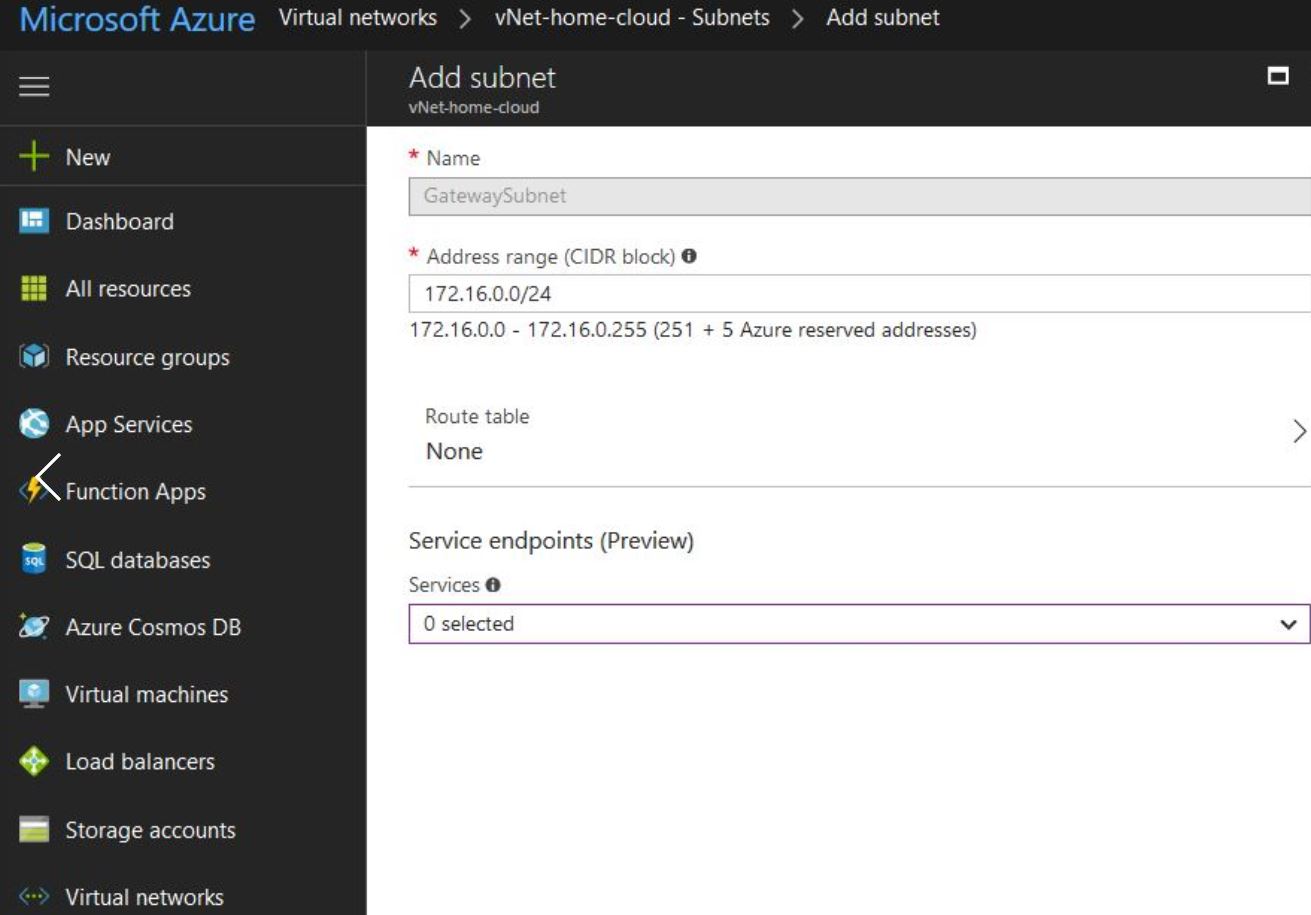
And the subnet were the VM will site :
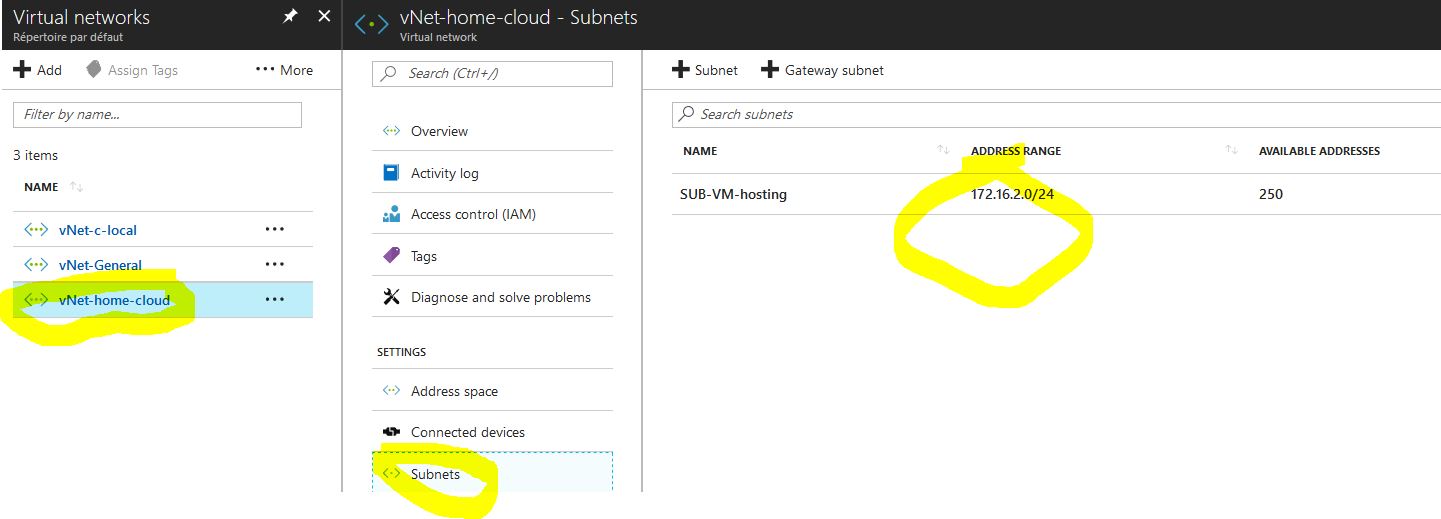
Subnet / Dashboard > Virtual Networks > ServerNetwork > Subnets > + Gateway subnet:

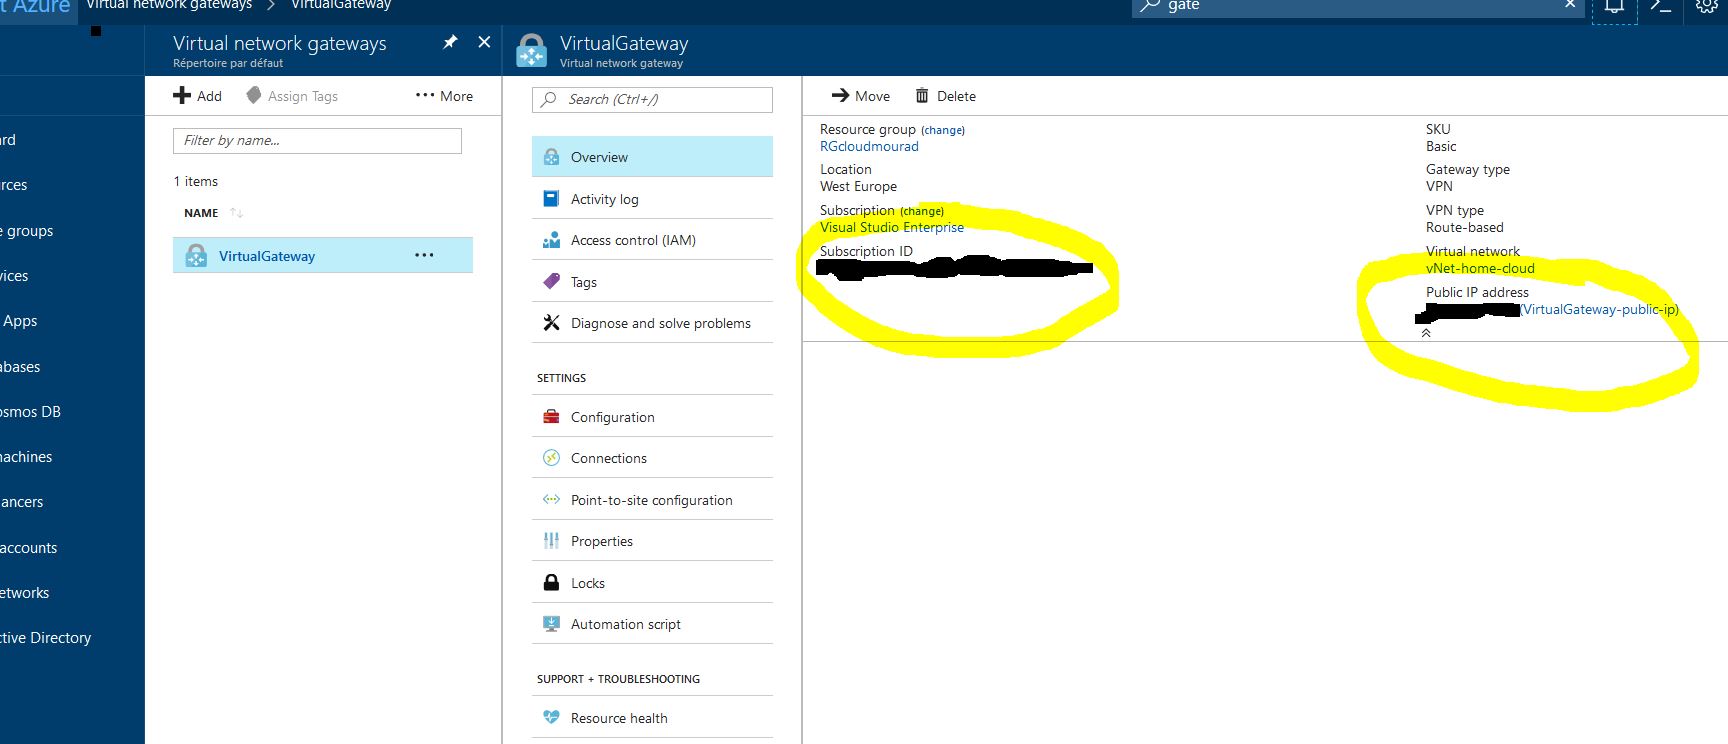
Do not forget to create public IP address for the gtw.
The deployment of the gtw may take some time , between 5 to 10 mins…
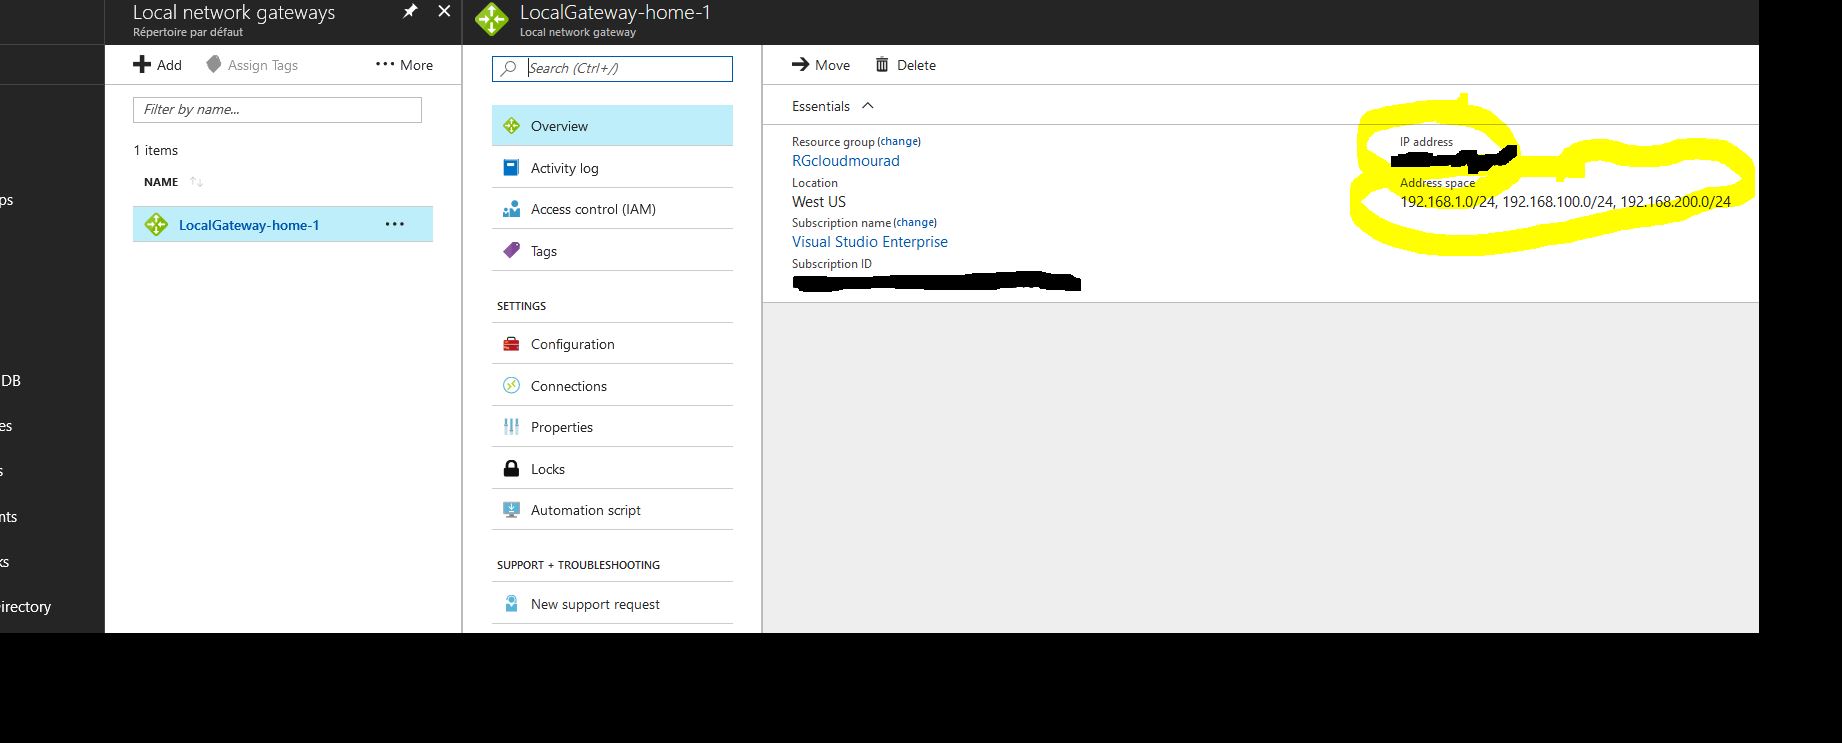
Create the local Network Gateway ( with your public of your internet box provided by the Network provider ) Dashboard > New > Networking > Local Network Gateway:

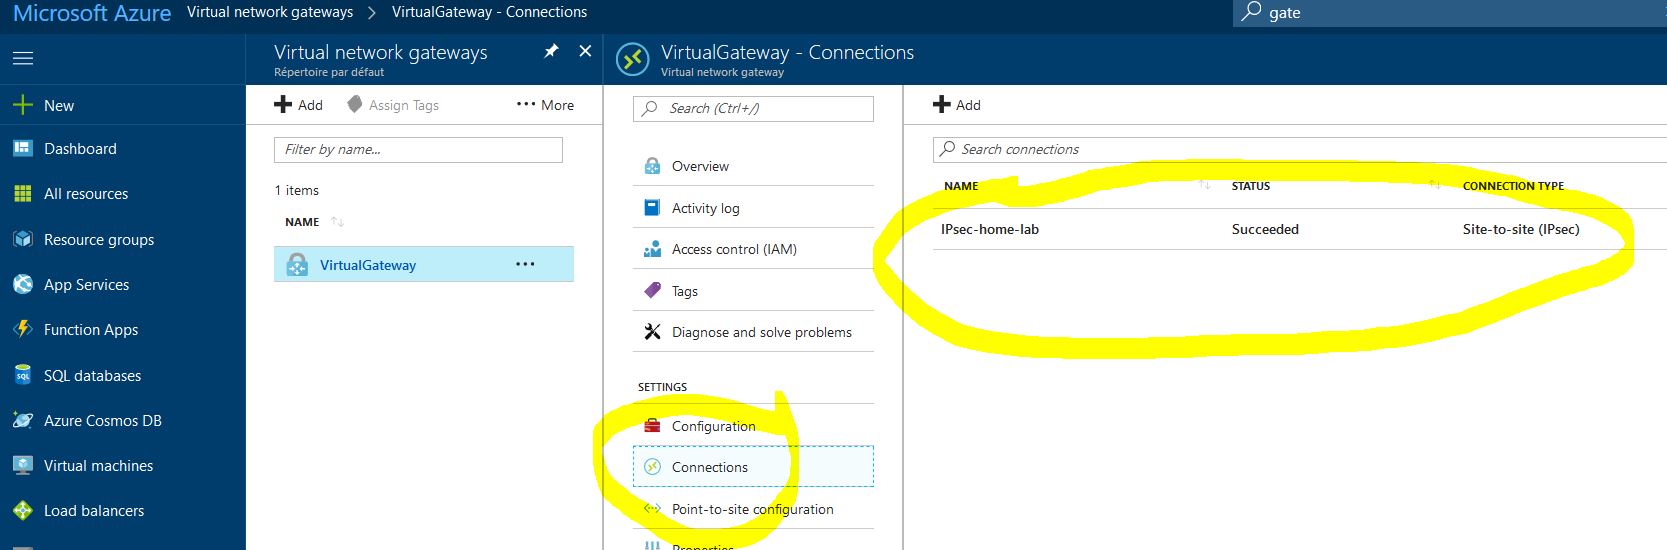


Create a VPN Connection and link the LocalGateway to the VirtualGateway ( the connection will not work yet ) / Daskboard >Virtual Network Gateways > VirtualGateway > Connections > + Add :

Now 2 possibilities, either you want to setup thru command lines only, so just go and copy past those commands :
configure
set vpn ipsec auto-firewall-nat-exclude enable
set vpn ipsec ike-group FOO0 key-exchange ikev2
set vpn ipsec ike-group FOO0 lifetime 28800
set vpn ipsec ike-group FOO0 proposal 1 dh-group 2
set vpn ipsec ike-group FOO0 proposal 1 encryption aes256
set vpn ipsec ike-group FOO0 proposal 1 hash sha1
set vpn ipsec esp-group FOO0 lifetime 27000
set vpn ipsec esp-group FOO0 pfs disable
set vpn ipsec esp-group FOO0 proposal 1 encryption aes256
set vpn ipsec esp-group FOO0 proposal 1 hash sha1
set vpn ipsec site-to-site peer 7.7.7.7 authentication mode pre-shared-secret
set vpn ipsec site-to-site peer 7.7.7.7 authentication pre-shared-secret <PASSW>
set vpn ipsec site-to-site peer 7.7.7.7 connection-type respond
set vpn ipsec site-to-site peer 7.7.7.7 description ipsec
set vpn ipsec site-to-site peer 7.7.7.7 local-address 192.168.1.1
set vpn ipsec site-to-site peer 7.7.7.7 ike-group FOO0
set vpn ipsec site-to-site peer 7.7.7.7 vti bind vti0
set vpn ipsec site-to-site peer 7.7.7.7 vti esp-group FOO0
set interfaces vti vti0
set firewall options mss-clamp interface-type vti
set firewall options mss-clamp mss 1350
set protocols static interface-route 10.1.0.0/16 next-hop-interface vti0
commit ; save
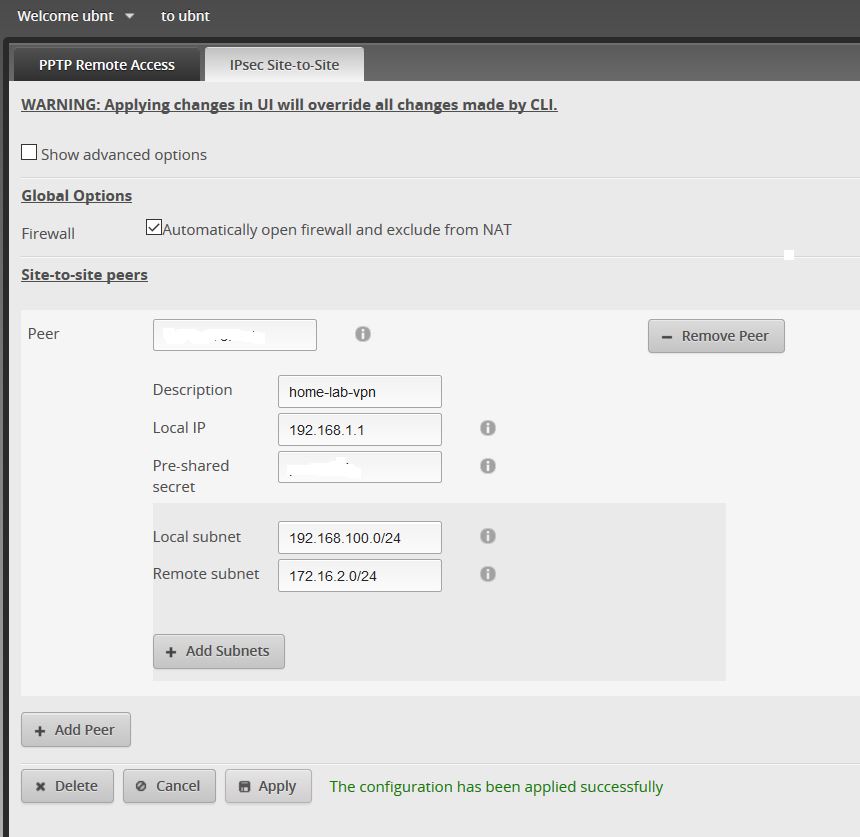
Or you have an existing connection and you want to edit it.. So In that case, you go back to the UbiRouter to set up the VPN / VPN > IPsec Site-to-Site > +Add Peer :
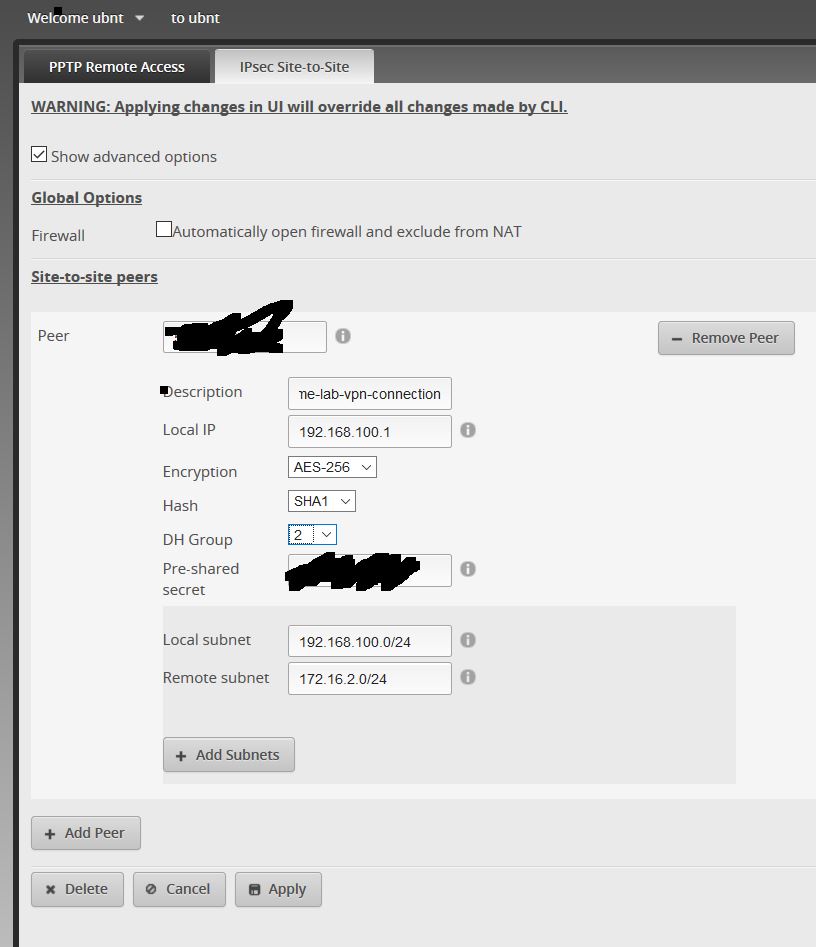
Edit : In my example, I wanted to connect subnet 192.168.100.0/24 on purpose. However, if you want to create several session, I would recommend putting 192.168.1.1 in “local IP” which is your router IP. Then Add several subnets Local+remote
Now go on ssh and type those commands :
*****Some parameters*****
set vpn ipsec esp-group FOO0 lifetime 27000
set vpn ipsec ike-group FOO0 lifetime 28800
set vpn ipsec esp-group FOO0 pfs disable
set vpn ipsec ike-group FOO0 key-exchange ikev2
set vpn ipsec site-to-site peer XXXXXPUBLICipOFmyAZUREgtwXXXXX connection-type respond
******create a vti*******
set interfaces vti vti0
set firewall options mss-clamp interface-type vti
set firewall options mss-clamp mss 1350
set protocols static interface-route 172.16.2.0/24 next-hop-interface vti0
delete vpn ipsec site-to-site peer XXXXXPUBLICipOFmyAZUREgtwXXXXX tunnel 1
set vpn ipsec site-to-site peer XXXXXPUBLICipOFmyAZUREgtwXXXXX vti bind vti0
set vpn ipsec site-to-site peer XXXXXPUBLICipOFmyAZUREgtwXXXXX vti esp-group FOO0
set system offload ipsec enable
*******Ending the config*******
commit
save
******* ALL SET *********

net.ipv4.conf.vti0.disable_policy = 1
net.ipv4.conf.vti0.disable_xfrm = 1
[ vpn ipsec site-to-site peer XXXXXPUBLICipOFmyAZUREgtwXXXXX vti ]


[ system offload hwnat disable ]
This change will take effect when the system is rebooted.
Now you should see something like this on your UbiRouter :

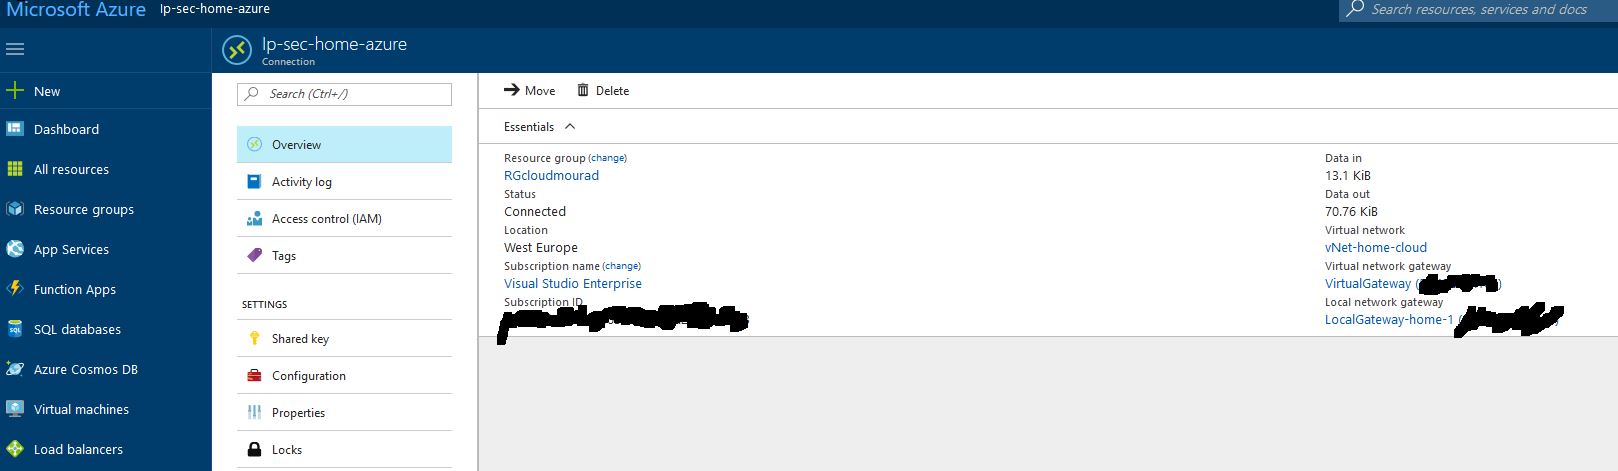
On the connection page in Azure portal, you should normal see a connection “success” and connected. Sometimes, my connection appears as “unknown”, This is a display issue, no worries on that.
In this part I will discuss and present the first part, how I moved my home hosting to Azure ( Microsoft) with a 130$/month subscription.
Step – 0 : Connecting to Azure using a VPN thru my personal router.
The router is a Ubiquiti edgemax router :

Vendor’s data sheet and Vendor’s page.
The cool thing about this switch is the possibilty to load default config. So you go in “wizards” like below :

The you select WAN+2LAN2 on your left and fill with your inputs. Be careful with the bo of your internet provider. In my example, I gave my UbiRouter a fixed IP. This IP is set on your internet provider box. In my case the IP of my UbiRouter’s Eth0 is 192.168.1.1 . See below :

After applying that configuration, you swicth is not manageable anymore from your previous interface ( 192.168.1.1) , this is because some firewall rules have been added. So you have to connect to 192.168.100.1 thru your eth1 port to modify the Firewall to let traffic from 192.168.1.0/24 to come in at ports 22 and 443 :

Your router should be set for now.
Last step is to configure your internet box. Make sure you do NAT/PAT – port forwarding on those 2 ports on the IP/mac of your UbiRouter:

Next step : site to site IPsec Configuration
Before discussing how I am trying to digitalize the way I work, I will present how I use to address day to day use-cases and situation with my own infra.
Pictures are better than long texts, so below is how I use to work :

As you may see, I use to host most of the services myself ( Mail, file, website etc…)
This infra costed me :
2100 Euros for a standalone hypervisor with 4x512GB SSD, 32 GB of RAM and 6600 intel with a Dual NIC ( 2 ports is a must by the way…)
65 Euros for a Ubiquiti routeur ( 4x 1GbE port with lv2 switch, Vlan, routing etc…)
I will not discuss the CCTV here and the raspberry pi ( 30 euros each..)
The user experience was very bad, in fact, my internet provider could only provide 4Mb/s down-link and 700Kb/s up-link. So the performances were soo Bad that I could not send mails properly and could not watch my pictures with my wife have a tchat at the same time…
So I will now explain how I changed this in part 1.